This appendix contains examples of how to configure selected features available in the TejNOS-EN software. Each example contains procedures on how to configure the feature by using the Web interface, CLI, and SNMP.
NOTE: Since the TejNOS-EN is a single unit system, the port 1/0/x is mentioned as port 0/x (where x = interface number) in the system WUI and CLI.
This appendix describes how to perform the following procedures:
Configuring Multiple Spanning Tree Protocol
Configuring 802.1X Network Access Control
Configuring Differentiated Services for VoIP
Configuring FIP Snooping
NOTE: Each configuration example starts from a factory-default configuration unless otherwise noted.
Configuring VLANs
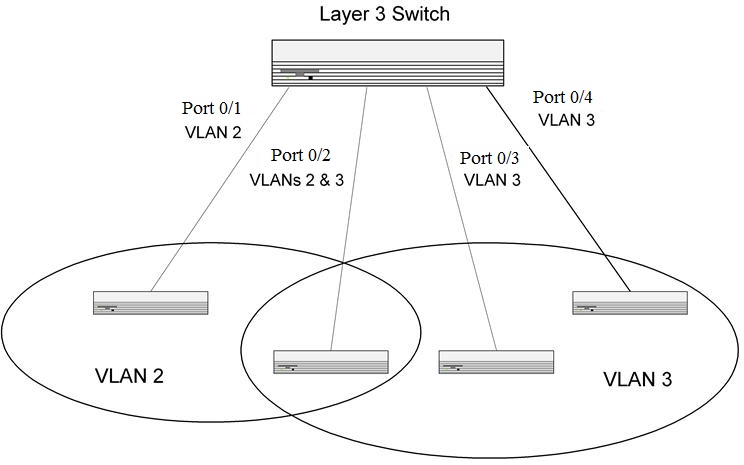
The diagram in this section shows a switch with four ports configured to handle the traffic for two VLANs. Port 1/0/2 handles traffic for both VLANs, while port 1/0/1 is a member of VLAN 2 only, and ports 1/0/3 and 1/0/4 are members of VLAN 3 only.
The following examples show how to create VLANs, assign ports to the VLANs, and assign a VLAN as the default VLAN to a port.
Using the Web Interface to Configure VLANs
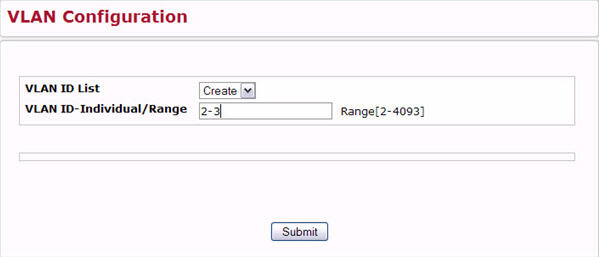
Access the Switching > VLAN > Configuration page.
Select the Create option in the VLAN ID List field.
Type 2-3 in the VLAN ID-Individual/Range field.
Click Submit.
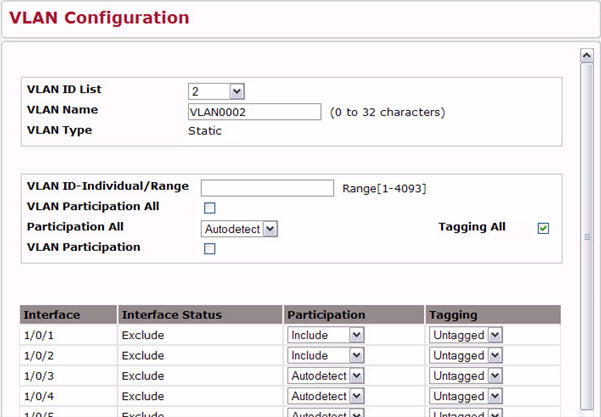
Select VLAN 2 from the VLAN ID List.
From the Participation column in the interface table, select Include for ports 1/0/1 and 1/0/2 to specify that these ports are members of VLAN 2.
Select the Tagging All checkbox to specify that frames will always be transmitted tagged from ports that are members of VLAN 2.
Click Submit.
Select VLAN 3 from the VLAN ID and Name List.
Select the Participate option in the VLAN field.
For ports 1/0/2, 1/0/3 and 1/0/4, select Include from the Participation menu to specify that these ports are members of VLAN 3.
Click Submit.
Go to the Switching > VLAN > Port Configuration page.
From the Interface menu, select 1/0/1.
In the Acceptable Frame Types field, select AdmitTaggedOnly to specify that untagged frames will be rejected on receipt.
Click Submit.
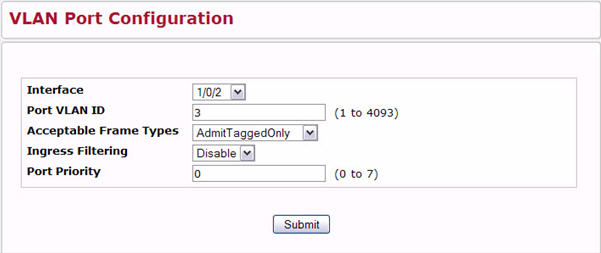
From the Interface menu, select 1/0/2.
In the Port VLAN ID field, enter 3 to assign VLAN 3 as the default VLAN for the port.
In the Acceptable Frame Types field, select AdmitTaggedOnly to specify that untagged frames will be rejected on receipt.
Click Submit.
Using the CLI to Configure VLANs
Create VLAN 2 and VLAN 3.
(Tejas Networks TejNOS-EN Routing) #vlan database
vlan 2
vlan 3
exit
Assign ports 1/0/1 and 1/0/2 to VLAN2 and specify that untagged frames will be rejected on receipt.
(Tejas Networks TejNOS-EN Routing) #Config
interface 1/0/1
vlan participation include 2
vlan acceptframe vlanonly
exit
interface 1/0/2
vlan participation include 2
vlan acceptframe vlanonly
While in interface config mode for port 1/0/2, assign VLAN3 as the default VLAN.
Specify that frames will always be transmitted tagged from ports that are members of VLAN 2.
(Tejas Networks TejNOS-EN Routing)(Config)#vlan port tagging all 2
exit
Assign the ports that will belong to VLAN 3.
NOTE: Port 1/0/2 belongs to both VLANs, and port 1/0/1 can never belong to VLAN 3.
(Tejas Networks TejNOS-EN Routing) #Config
interface 1/0/2
vlan participation include 3
exit
interface 1/0/3
vlan participation include 3
exit
interface 1/0/4
vlan participation include 3
exit
exit
Specify that untagged frames will be accepted on port 1/0/4.
(Tejas Networks TejNOS-EN Routing) #Config
interface 1/0/4
vlan acceptframe all
exit
exit
Using the SNMP to Configure VLANs
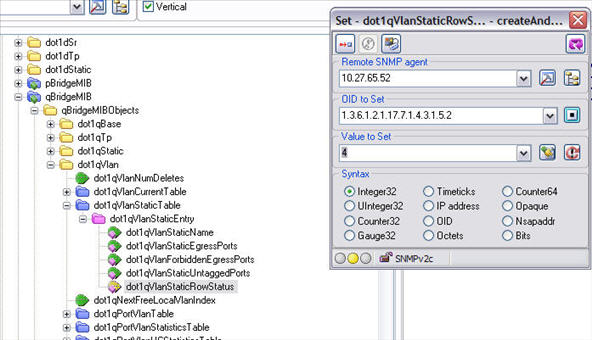
Use the objects in dot1qVlanStaticTable (in dot1qVlan in the QBRIDGE-MIB module) to create VLANs 2 and 3.
Set the dot1qVlanStaticRowStatus object to ‘CreateandGo (4)’ to create a VLAN. If the other parameters are not specified, simply specifying the dot1qVlanIndex and dot1qVlanStaticRowStatus is sufficient to create the VLAN.
The full path to the object is iso(1).org(3).dod(6).internet(1).mgmt(2).mib-2(1).dot1dBridge(17).qBridgeMIB(7). qBridgeMIBObjects(1).dot1qVlan(4).dot1qVlanStaticTable(3).dot1qVlanStaticEntry(1).dot1qVlanStaticRowStatus(5).
To assign ports 1/0/1 and 1/0/2 to VLAN2, retrieve the current dot1qStaticEgressPorts mask and append interfaces 1/0/1 and 1/0/2 to this mask by setting the first octet to 0xC0.
The dot1qVlanStaticEgressPorts bit mask can be constructed according to the following rules:
Each octet within this value specifies a set of eight ports, with the first octet specifying ports (1-8), the second octet specifying ports (9-16), and so on.
Within each octet, the most significant bit represents the lowest numbered port, and the least significant bit represents the highest numbered port. Thus, each port of the bridge is represented by a single bit within the value of this object. If that bit has a value of (1), then that port is included in the set of ports. The port is not included if its bit has a value of (0).
To specify that frames will always be transmitted tagged from ports that are members of VLAN 2, use the dot1qVlanStaticUntaggedPorts object and set the value of the appropriate number of octets to 0.
Each octet represents eight ports, so for a 48-port switch, the first six octets would be zero.
To specify that ports 1/0/1 and 1/0/2 will only accept tagged frames and will reject untagged frames on receipt, set the dot1qPortAcceptableFrameTypes object to admitOnlyVlanTagged(2).
The object is in dot1qPortVlanEntry in the dot1qPortVlanTable.
To assign VLAN3 as the default VLAN for interface 1/0/2., set the value of dot1qPvid for 1/0/2 (instance 2) to 3.
To assign ports 1/0/2, 1/0/3, and 1/0/4 to VLAN3, retrieve the current dot1qStaticEgressPorts mask and append the interfaces to this mask by setting the first octet to 0x70.