![]()
![]()
![]()
![]()
|
|
|
|
|
TejNOS-EN software includes a set of comprehensive management functions for configuring and monitoring the system by using one of the following methods:
Each of the standards-based management methods allows you to configure and monitor the components of the TejNOS-EN software. The method you use to manage the system depends on your network size and requirements, and on your preference. This guide describes how to use the Web-based interface to manage and monitor the system.
NOTE: The Web configuration and monitoring pages and CLI commands available for each platform depend on the TejNOS-EN software version and modules installed. For more information about the modules, refer Getting Started.
To access the switch by using a Web browser, the browser must meet the following software requirements:
Use the following procedures to log on to the Web Interface:
NOTE: In case of password to be recovered, the password recovery is done through CLI prompt. Once done, login to User Interface (UI) with admin as the user and then change the password.
Each Web page contains two main areas: the navigation menu and the configuration status.
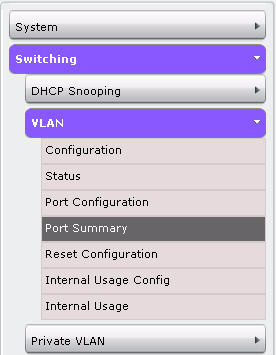
The navigation menu is on the left side of the Web interface. The navigation menu contains a list of various device features. The main items in the navigation menu can be expanded to view all the components under a specific feature, or retracted to hide the feature's components. The navigation menu consists of a combination of main feature menus, submenus, and configuration and status pages. Click the feature menu, such as System or Switching, to view the options in that menu. Each menu contains submenus, HTML pages, or a combination of both. Figure below shows an example of a feature menu (Switching), submenu (VLAN), and the active page in the navigation menu (Port Configuration).
When you click a menu or submenu, the color turns from gray to blue, the menu expands to show its contents, and the arrow on the right side of the menu rotates. If you click a page under a menu or submenu, a new page displays in the main frame.
The main area of the screen displays the fields you use to configure or monitor the switch. On pages that contain configuration options, you can input information into fields or select options from drop-down menus.
Each page contains access to the HTML-based help that explains the fields to configure or view on the page. Many pages also contain command buttons.
Command buttons
Button |
Function |
|---|---|
Submit |
Sends the updated configuration to the switch. Configuration changes take effect immediately, but changes are not retained across a power cycle unless you save them to the system configuration file. To save the configuration to non-volatile memory, navigate to the System > System Utilities > Save All Applied Changes page and click Save. |
Refresh |
Refreshes the page with the most current information. |
Delete |
Removes the selected entry from the running configuration. |
Clear |
Removes all entries from a table or resets statistical counters to the default value. |
Logout |
Ends the session. |
 CAUTION: Submitting changes makes them effective during the current boot session only. You must save any changes if you want them to be retained across a power cycle (reboot).
The Help button is always available in the upper right corner of the screen. Click Help to open a new page that contains information about the configuration fields, status fields, and command buttons available on the active page. The online help pages are context sensitive.
![]()
User-defined fields can contain 1-159 characters, unless otherwise noted on the configuration Web page. All characters may be used except for the following (unless specifically noted in for that feature):
\ <
/ >|
* |
?
The command-line interface (CLI) is a text-based way to manage and monitor the system. You can access the CLI by using a direct serial connection or by using a remote logical connection with telnet or SSH. The CLI groups commands into modes according to the command function. Each of the command modes supports specific software commands. The commands in one mode are not available until you switch to that particular mode, with the exception of the User EXEC mode commands. You can execute the User EXEC mode commands in the Privileged EXEC mode.
To display the commands available in the current mode, enter a question mark (?) at the command prompt. To display the available command keywords or parameters, enter a question mark (?) after each word you type at the command prompt. If there are no additional command keywords or parameters, or if additional parameters are optional, the following message appears in the output:
<cr> Press Enter to execute the command
The TejNOS-EN CLI Command Reference lists each command available from the CLI by the command name and provides a brief description of the command. Each command reference also contains the following information:
The show commands in the document also include a description of the information that the command shows.
For TejNOS-EN software that includes the SNMP module, you can configure SNMP groups and users that can manage traps that the SNMP agent generates. TejNOS-EN uses both standard public MIBs for standard functionality and private MIBs that support additional switch functionality. All private MIBs begin with a “-” prefix. The main object for interface configuration is in - SWITCHING-MIB, which is a private MIB. Some interface configurations also involve objects in the public MIB, IF-MIB.
SNMP is enabled by default. The System Description Web page, which is the page the displays after a successful login, and the show sysinfo command display the information you need to configure an SNMP manager to access the switch.
Any user can connect to the switch using the SNMPv3 protocol, but for authentication and encryption, you need to configure a new user profile.
To configure an SNMPv3 profile by using the Web interface, use the following steps: