![]()
![]()
![]()
![]()
|
|
|
|
|
This section describes the Node setup process.
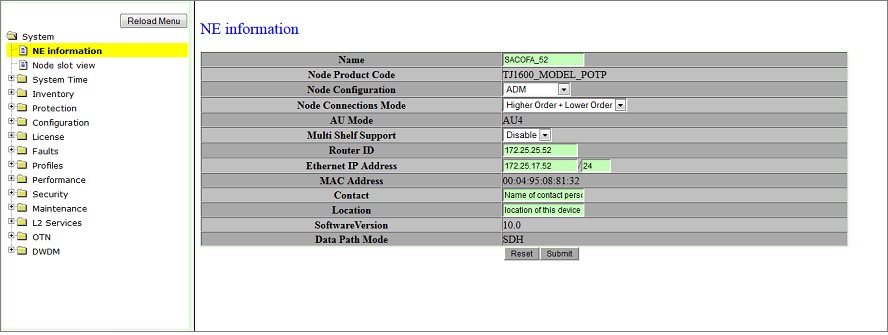
On NE information pane, you can access and modify basic configuration information of a node including node Name, Router ID, Ethernet IP, Contact, and Location fields.
Editing the fields on NE information pane is service non-disruptive. The software reboots without affecting the commissioned traffic (warm reset) when Router ID or Ethernet IP is changed. The node does not reboot for any changes made in name or location. Connectivity to the node software is lost while rebooting.
Perform the steps given below to set or edit the node information.
A click on Back link will direct you to NE information preview pane.
Configurable Node parameters
Parameter |
Description |
Default Value |
Acceptable Value |
|---|---|---|---|
Name |
Allows you to enter an identification label for the node. |
-- |
Alphanumeric and special characters. Special characters include !, ), (, $, %, ^, &, *, @, # |
Node Product Code |
Displays the product code of the node. |
TJ1600_MODEL_POTP |
-- |
Node Configuration |
Displays the configuration of the node. NOTE: Only 'ADM' option is supported in this product release. |
ADM |
|
Node Connections Mode |
Allows you to select the node connection mode. The selection to be made is determined by user requirement and the cross-connect card present on the node. NOTE: Only 'Higher Order + Lower Order' option is supported in this product release. |
Higher Order + Lower Order |
|
AU Mode |
Displays the data mapping mode of the node. |
AU4 |
-- |
Multi Shelf Support |
Allows you to enable or disable the multi shelf support on the node.
NOTE: Multi Shelf Support is not supported in this product release; user must select only 'Disable' option. |
Disable |
|
Router ID |
Allows the user to enter the IP address of the node for in-band communication. The Router ID is unique in a network and is used by the Network Management System (NMS) to identify and enroll the node. |
192.168.1.254 |
0.0.0.0 to 254.254.254.254 |
Ethernet IP Address |
Allows the user to enter the IP address and the subnet mask for the node for LAN port communication. |
192.168.1.254/24 |
0.0.0.0 to 254.254.254.254. The mask can take a value of 8, 16, or 24. |
MAC Address |
Displays the MAC address of the chassis. The chassis MAC address is different from CEF-5 (switching card) present on the node, which will have its own MAC Address. |
-- |
-- |
Contact |
Allows the user to enter the contact details and number of the person maintaining the node. |
-- |
Up to 255 alphanumeric and special characters |
Location |
Allows the user to enter the location or site information where the node is physically installed. |
-- |
Up to 255 alphanumeric and special characters |
Software Version |
Displays the version of the software installed on the node. |
-- |
-- |
Data Path Mode |
Displays the mode of operation of the node. |
SDH |
-- |