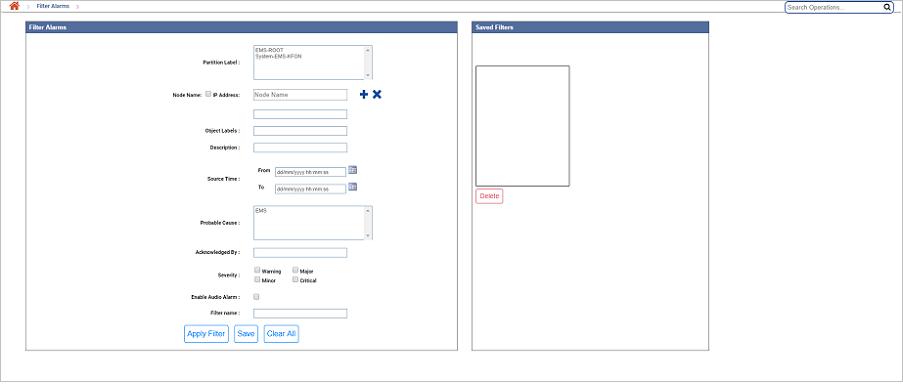
To filter alarms go to Fault menu and click on Filter Alarms. The Filter Alarms page is displayed.

Filter Alarms parameters
Parameter |
Description |
|---|---|
Filter Alarms |
|
Partition Label |
Select a partition from the available options for which the alarms need to be filtered. NOTE: Selection of one Partition Label from the displayed options is must while adding nodes in order to filter alarms. |
Node Name/IP Address |
Enter the node name in the text box provided or select the IP Address check box and then enter the IP Address of the node. After entering the node name/IP address, click (Add Node to Alarm filter) to add the node for filtering the associated alarms. To add multiple nodes, enter the desired node name/IP address and click Add Node to Alarm filter button again. You can use (Delete Node from Selected Nodes) button to delete the node name/IP address entered. NOTE: Before adding the node, ensure that you have selected a partition label (only one selection allowed). |
Object Labels |
To filter alarms based on object on which it was raised, enter the text within asterisks * i.e. *Object Label*. |
Description |
Enter the description of the alarm in the text box provided as a filtering criteria within asterisks * i.e. *Description*. |
Source Time |
Click the calendar icon and select date and time range (From and To) to filter the alarms. 'From' date cannot be greater than 'To' date; both 'From' and 'To' dates cannot be greater than current date. |
Probable Cause |
Select the probable cause of the alarm from the available options as a filtering criteria. |
Acknowledged By |
Enter the 'acknowledgment by' user name as a filtering criteria within asterisks * i.e. *Acknowledged By*. |
Severity |
To filter the alarms based on severity, select the desired check box(s) from the options available namely Warning, Major, Minor, and Critical. |
Enable Audio Alarm |
Select the check box to enable the audio alarms monitoring. |
Filter name |
Provide a filter name to save the filtering criteria selected/entered. |
clear all |
Click the link to reset the parameters on Filter Alarms pane to default values. |
Saved Filters |
|
List of <Filter name> saved by user |
Displays the filter names saved. Click the desired filter name to display the filtering criteria under Filter Alarms pane on left hand side and to apply that filter. |
Delete |
Click the button to delete the selected filter name. |
Delete Saved Filters
Perform the following steps to delete the filters displayed under Saved Filters pane:
You can enable audio alert for any new alarms raised. This feature is provided in the Filter Alarms menu.
Perform the following steps to enable the audio alarms monitoring: