![]()
![]()
![]()
![]()
|
|
|
|
|
Access Control Lists (ACLs) ensure that only authorized users have access to specific resources while blocking off any unwarranted attempts to reach network resources. ACLs are used to provide traffic flow control, restrict contents of routing updates, decide which types of traffic are forwarded or blocked, and above all provide security for the network. TejNOS-EN software supports IPv4, IPv6, and MAC ACLs. The total number of MAC and IP ACLs supported by TejNOS-EN software is platform-specific. You first create an IPv4-based, IPv6-based, or MAC-based rule and assign a unique ACL ID. Then, you define the rules, which can identify protocols, source and destination IP and MAC addresses, and other packet-matching criteria. Finally, you use the ID number to assign the ACL to a port or to a VLAN interface.
IP access control lists (ACL) allow network managers to define classification actions and rules for specific ports. ACLs are composed of access control entries (ACE), or rules, that consist of the filters that determine traffic classifications. The total number of rules that can be defined for each ACL is platform-specific. These rules are matched sequentially against a packet. When a packet meets the match criteria of a rule, the specified rule action (Permit/Deny) is taken, including dropping the packet or disabling the port, and the additional rules are not checked for a match.
The IP Access Control List folder contains links to web pages that allow you to configure and view IP ACLs.
To configure an IP ACL:
IP ACL Configuration
Use the IP ACL Configuration page to add or remove IP-based ACLs. On this menu the interfaces to which an IP ACL applies must be specified, as well as whether it applies to inbound or outbound traffic. Rules for the IP ACL are specified/created using the “IP ACL Rule Configuration”page.
To display the IP ACL Configuration page, click QoS > Access Control Lists > IP Access Control Lists > Configuration in the navigation menu.
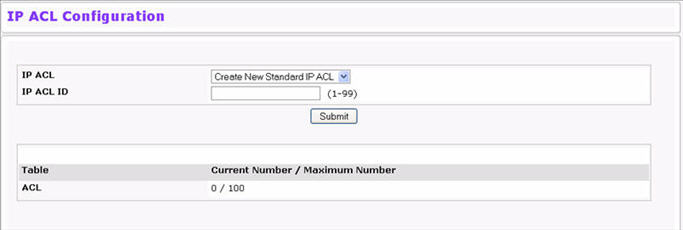
IP ACL Configuration Fields
Field |
Description |
|---|---|
IP ACL |
Select a type of ACL to create, or select an existing ACL to delete from the dropdown menu. You can create the following types of IP ACLs:
|
IP ACL ID |
Enter an ID number for the ACL to configure. This field appears if you select Create Standard IP ACL or Create Extended IP ACL from the IP ACL dropdown menu. For a standard IP ACL, the acceptable ID values are 1-99. For an extended IP ACL, the acceptable ID values are 101-199. |
IP ACL Name |
This field appears if you select Create New Named IP ACL from the IP ACL dropdown menu. Specify an IP ACL Name string which includes only alphanumeric characters. The name must start with an alphabetic character. This field will display the name of the currently selected IP ACL if the ACL has already been created. |
Table |
Identifies the type of table. |
Current Number / Maximum Number |
Shows the current size of the ACL table versus the maximum size of the ACL table. The current size is equal to the number of configured IPv4 and IPv6 ACLs plus the number of configured MAC ACLs. The maximum size is 100. |
To add an IP ACL, select the type of ACL to add from the IP ACL dropdown menu, enter an ACL ID in the appropriate field, and then click Submit.
To delete an IP ACL, select the ACL ID from the IP ACL dropdown menu, and then click Delete. The Delete button appears only if a configured IP ACL is selected.
IP ACL Summary
Use the IP ACL Summary page to view all IP ACLs and their related data.
To display the IP ACL Summary page, click QoS > Access Control Lists > IP Access Control Lists > Summary in the navigation menu.

IP ACL Summary Fields
Field |
Description |
|---|---|
IP ACL ID/Name |
Shows the user-configured ID number/name associated with the ACL. The range for a standard IP ACL is 1-99. For an extended IP ACL, the ID range is 101- 199. ACLs identified by a name are extended ACLs. |
Rules |
Shows the number of rules currently configured for the IP ACL. |
Direction |
Shows the direction of packet traffic affected by the IP ACL. The direction can only be Inbound or Outbound. |
Interface |
Shows the interfaces to which the IP ACL applies. |
VLAN |
VLAN(s) to which the IP ACL applies. |
Click Refresh to update the information on the screen.
IP ACL Rule Configuration
Use the IP ACL Rule Configuration page to define rules for IP-based ACLs created using the IP Access Control List Configuration page. The access list definition includes rules that specify whether traffic matching the criteria is forwarded normally or discarded. Additionally, you can specify to assign traffic to a particular queue, filter on some traffic, change VLAN tag, shut down a port, and/or redirect the traffic to a particular port.
NOTE: There is an implicit "deny all" rule at the end of an ACL list. This means that if an ACL is applied to a packet and if none of the explicit rules match, then the final implicit "deny all" rule applies and the packet is dropped.
To display the IP ACL Rule Configuration page, click QoS > Access Control Lists > IP Access Control Lists > Rule Configuration in the navigation menu. The fields available on the page depend on whether you select a standard, extended, or named IP ACL from the IP ACL field, whether the rule action is permit or deny, and whether you select Create Rule or an existing rule from the Rule field.
Figure below shows the fields available when Create Rule is selected in the Rule field.

Figure below shows the fields available when you configure a rule for a standard IP ACL.
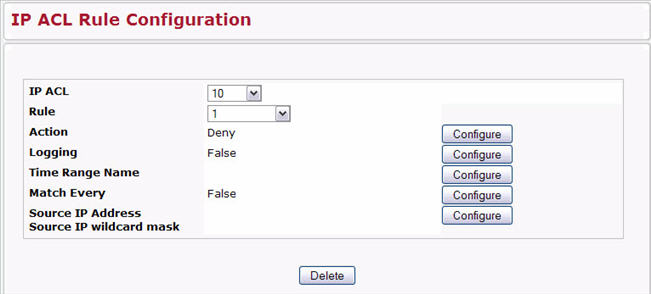
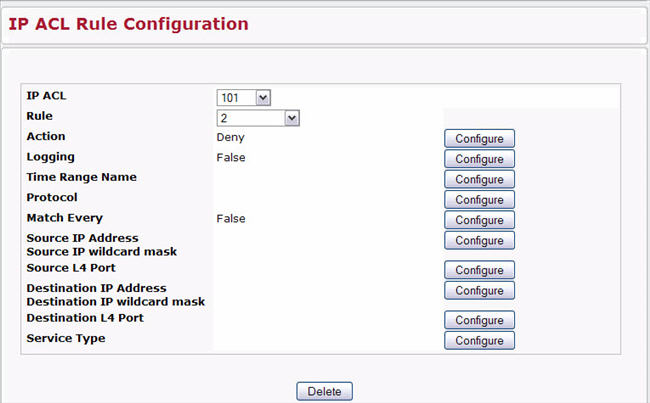
Figure below shows the fields available when you create a rule for an extended IP ACL.
NOTE: A Named IP ACL is identical to an Extended IP ACL in every characteristic and capability except that the Named IP ACL is identified by name rather than number.
Table below shows all possible fields on the IP ACL Rule Configuration page. The actual fields available on the page depend on what type of rule you configure, whether you create a new rule or modify an existing rule, and whether the rule action is Permit or Deny.
IP ACL Rule Configuration Fields
Field |
Description |
|---|---|
IP ACL |
The menu contains the existing IP ACLs configured on the page. |
Rule |
Select an existing Rule ID to modify or select Create Rule to configure a new ACL Rule. New rules cannot be created if the maximum number of rules has been reached. for each rule, a packet must match all the specified criteria in order to be true against that rule and for the specified rule action (Permit/ Deny) to take place. |
Rule ID |
This field is only available if you select Create Rule from the Rule field. Enter a new Rule ID which is a whole number in the range of 1 to 28 that will be used to identify the rule. After you click Submit, the new ID is created and you can configure the rule settings. The number of rules you can create in an ACL is platform dependent. |
Action |
Selects the ACL forwarding action. Click Configure to change the action. Select the desired action from the dropdown menu, and then click Submit or Cancel to return to the Rule Configuration page. Possible values are;
|
Logging |
This field is only visible for a Deny Action. When set to True, logging is enabled for this ACL rule (subject to resource availability in the device). If the Access List Trap Flag is also enabled, this will cause periodic traps to be generated indicating the number of times this rule went into effect during the current report interval. A fixed 5 minute report interval is used for the entire system. A trap is not issued if the ACL rule hit count is zero for the current interval. |
Time Range Name |
Use this field to impose a time limitation on the ACL rule. When you click Configure, you can select a configured time range or create a new named time range. To configure the time range values, use the System > Time Ranges > Time Range Entry Configuration page. If a time range with the specified name does not exist and the ACL containing this ACL rule is applied to an interface or bound to a VLAN, then the ACL rule is applied immediately. If a time range with specified name exists and the ACL containing this ACL rule is applied to an interface or bound to a VLAN, then the ACL rule is applied when the time-range with specified name becomes active. The ACL rule is removed when the time-range with specified name becomes inactive. |
Assign Queue ID |
This field is only visible when the Action is Permit. Use this field to specify the hardware egress queue identifier used to handle all packets matching this AP ACL Rule. Click Configure, and then enter an identifying queue number in the appropriate field. The number of queues available to select from is dependent upon platform and stacking. Click Submit or Cancel to return to the Rule Configuration page. |
Redirect Interface |
This field is only visible when the Action is Permit. Use this field to specify the specific egress interface where the matching traffic stream is forced, bypassing any forwarding decision normally performed by the device. This field cannot be set if a Mirror Interface is already configured for the ACL rule. Click Configure, and then select an interface from the dropdown list. Packets that meet the rule are redirected to the interface you select. Click Submit or Cancel to return to the Rule Configuration page. |
Mirror Interface |
This field is only visible when the Action is Permit. Use this field to specify the specific egress interface where the matching traffic stream is copied in addition to being forwarded normally by the device. Click Configure, and then select an interface from the dropdown list. Packets that meet the rule are mirrored on the interface you select. Click Submit or Cancel to return to the Rule Configuration page. |
Match Every |
Requires a packet to match the criteria of this ACL. Click Configure, and then select True or False from the dropdown list. Then click Submit or Cancel to return to the Rule Configuration page. True signifies that all packets will match the selected IP ACL and Rule and will be either permitted or denied. Match Every is exclusive to the other filtering rules, so if Match Every is True, the other rules on the screen do not appear. To configure specific match criteria for the rule, remove the rule and re-create it, or reconfigure ‘Match Every’ to ‘False’ for the other match criteria to be visible. |
Protocol Keyword |
Specify that a packet’s IP protocol is a match condition for the selected IP ACL rule. The possible values are ICMP, IGMP, IP, TCP, and UDP. Either the ‘Protocol Keyword’ field or the ‘Protocol Number’ field can be used to specify an IP protocol value as a match criteria. Click Configure, and then select the protocol keyword from the dropdown list. Click Submit or Cancel to return to the Rule Configuration page. |
Protocol Number |
Specify that a packet’s IP protocol is a match condition for the selected IP ACL rule and identify the protocol by number. The protocol number is a standard value assigned by IANA and is interpreted as a integer from 1 to 255. Either the ‘Protocol Number’ field or the ‘Protocol Keyword’ field can be used to specify an IP protocol value as a match criterion. |
Source IP Address |
Requires a packet’s source port IP address to match the address listed here. Click Configure, and then enter an IP Address in the appropriate field using dotted-decimal notation. The address you enter is compared to a packet's source IP Address. You also configure the Source IP Mask on the page. |
Source IP Wildcard Mask |
Specifies the source IP address wildcard mask. Wild card masks determines which bits are used and which bits are ignored. A wild card mask of 255.255.255.255 indicates that no bit is important. A wildcard of 0.0.0.0 indicates that all of the bits are important. Wildcard masking for ACLs operates differently from a subnet mask. A wildcard mask is in essence the inverse of a subnet mask. With a subnet mask, the mask has ones (1's) in the bit positions that are used for the network address, and has zeros (0's) for the bit positions that are not used. In contrast, a wildcard mask has (0’s) in a bit position that must be checked. A ‘1’ in a bit position of the ACL mask indicates the corresponding bit can be ignored. This field is required when you configure a source IP address. After you enter the desired information for the Source IP Address and Source IP Mask, click Submit or Cancel to return to the Rule Configuration page. |
Source L4 Port |
Requires a packet’s TCP/UDP source port to match the port listed here. Click Configure access the configuration page, then complete one of the following fields:
|
Destination IP Address |
Requires a packet’s destination port IP address to match the address listed here. Click Configure, and then enter an IP Address in the appropriate field using dotted‐decimal notation. The address you enter is compared to a packet's destination IP Address. You also configure the Destination IP Mask on the page. |
Destination IP Wildcard Mask |
Specify the IP mask in dotted-decimal notation to be used with the Destination IP Address value. |
Destination L4 Port |
Requires a packet’s TCP/UDP destination port to match the port listed here. Click Configure access the configuration page, then complete one of the following fields:
|
Service Type |
Select one of the following three Match conditions for the extended IP ACL rule. These are alternative ways of specifying a match condition for the same Service Type field in the IP header, however each uses a different user notation. After a selection is made, the appropriate value can be specified:
|
Modifying an IP-based Rule
NOTE: Rules can be modified only when the ACL to which they belong is not bound to an interface.
Adding a New Rule to an IP-based ACL
Deleting a Rule from an IP-based ACL
Use the IP ACL Rule Status Summary page to view whether the time-based rule within an ACL is currently active or inactive. To display the IP ACL Rule Status Summary page, click QoS > Access Control Lists > IP Access Control Lists > Rule Status Summary in the navigation menu.

IP ACL Rule Status Summary Fields
Field |
Description |
|---|---|
IP ACL |
Shows the user-configured ID number or name associated with the ACL. The range for a standard IP ACL is 1-99. For an extended IP ACL, the ID range is 101-199. ACLs identified by a name are extended ACLs. |
Rules |
Identifies a rule currently configured for the IP ACL. |
Time Range Name |
Identifies the time range associated with the rule. |
Rule Status |
Identifies whether the time-based rule is active. If the current time is outside of the defined time range, the rule is inactive. |
Click Refresh to update the information on the screen.