![]()
![]()
![]()
![]()
|
|
|
|
|
Perform the steps given below to add a trunk manually between the Local and the Remote Nodes.
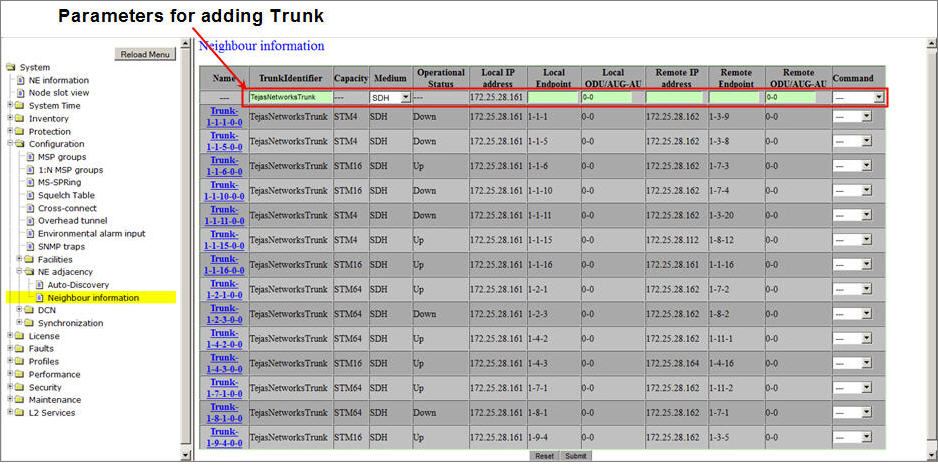
Adding Trunk parameters
Parameter |
Description |
Default Value |
Acceptable Value |
|---|---|---|---|
Name |
Displays the trunk name. |
-- |
-- |
TrunkIdentifier |
Allows you to add an identifier for the trunk to be created. |
TejasNetworksTrunk |
Any alphanumeric value |
Capacity |
Displays the trunk capacity. |
-- |
-- |
Medium |
Select the type of trunk desired to create. SDH is the default selection. |
SDH |
|
Operational Status |
Displays the operating status of the trunk. |
|
|
Local IP address |
Displays the IP address of the local node. |
IP address assigned to the node |
-- |
Local Endpoint |
Enter the STM port number on the local node on which the trunk is desired to create. |
-- |
STMn ports available on the node |
Local ODU/AUG-AU |
Enter the value for the Aggregate units at the STM level. |
0-0 |
1-1 to 1-64 |
Remote IP address |
Enter the IP address of the remote node. |
-- |
0.0.0.0 to 255.255.255.254 |
Remote Endpoint |
Enter the STM port number on the remote node. |
-- |
STMn ports available on the node |
Remote ODU/AUG-AU |
Enter the value for the Aggregate units at the STM level. |
0-0 |
1-1 to 1-64 |
Command |
Click on the drop down option and select the command as 'Add Trunk'. |
-- |
Add Trunk |