From the Settings page, click Schedule Reports. This page displays detailed information of all Scheduled Reports.
Action icons to Edit , Send and Delete Report Schedule is displayed.
Add/Create a Scheduled Report
From the Scheduled Reports page, click Add to be redirected to Schedule Report Page.
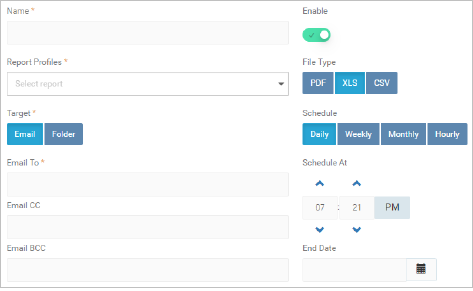
Provide a Report name in the ‘Name*’ textbox.
Use the toggle Button to Enable/Disable the Schedule. Please note that the Schedule must be ’Enabled’ for the report to be generated.
Select a Report Profile* (which needs to be scheduled) using the Dropdown Menu. Multiple reports can be selected.
Select the format in which the Report needs to be delivered. The options are PDF, XLS, and CSV.
Select a Target* for the Report Delivery.
If the Report must be mailed, select ‘Email’.
Provide the Email address, to which the email must be sent. Use “,” as a separator to add multiple ID’s.
CC and BCC mail ID’s can be added (optional).
To save the Report in a specific folder, select ‘Folder’.
Mention the pathname for the folder, to save the reports.
Select a Schedule for the Report i.e. whether the report must be generated
Daily - Select the Time for Report generation.
Weekly – Select the Days* of the week and Time for report generation.
Monthly – Select the date* and Time for report generation.
Hourly – Select the Minute Interval for Report generation; Mention the Time in HH:MM-HH:MM format for the Start Time and End Time of the Hourly Report generation.
Click to select an End Date for the Report Schedule. Reports will not be generated beyond the selected date. * denotes Mandatory Field.
Click Save to save the Report Schedule. Saved Report Schedules are displayed in the Schedule.