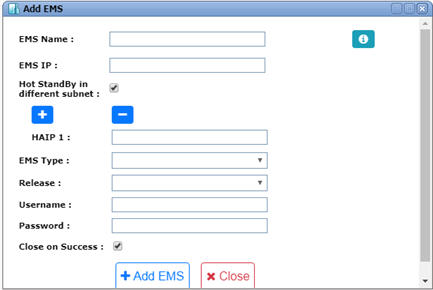
Perform the following steps to add an EMS on NMS:

Add EMS parameters
Parameter |
Description |
Default Value |
Acceptable Values |
|---|---|---|---|
EMS Name |
Enter the name for the EMS. EMS name entered in NMS should be the same as that entered during EMS installation. |
-- |
Name provided at the time of installation. |
EMS IP |
Enter the IP address of EMS to be added; refer to the following cases:
|
<EMS Server IP> |
-- |
Hot StandBy in different subnet |
Select the check box when EMS to be added is in Hot StandBy mode in different subnet. On selection, the HAIP (Hot StandBy IP) field is displayed. |
-- |
-- |
|
Click Add HAIP to add the Hot Standby IPs. |
-- |
-- |
|
Click Delete HAIP to delete the Hot Standby IP. |
-- |
-- |
HAIP |
Enter the physical/virtual IP address of the secondary/slave EMS.
|
<EMS Server IP> |
Valid IP address |
EMS Type |
Select the EMS type from the drop-down list. |
-- |
List of EMS types. The options available are license driven and should be selected from the list displayed. |
Release |
Select the release number for the EMS type selected. |
<current release version> |
List of EMS release number. The options available are license driven and should be selected from the list displayed. |
Username |
Enter the user name for the EMS to be added. |
-- |
-- |
Password |
Enter the password corresponding to the EMS username entered. |
-- |
-- |
Close on Success |
Select the check box if the user desires to close the Add EMS window after the EMS is added successfully. This check box will be selected by default. Un-check the check box if more than one EMS is desired to be added. |
-- |
-- |
NOTE: Click |
|||