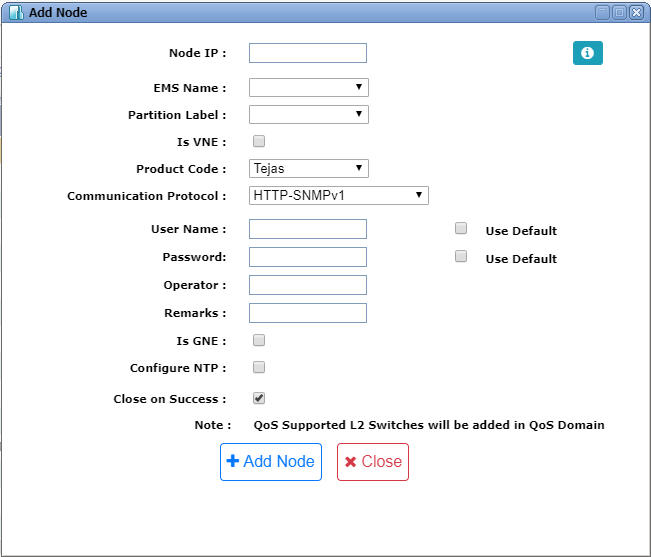
Perform the following steps to add a Managed Element to TJ5500 from TJ5500 WUI:

NOTE: An error message is displayed if the user tries to add a node which is already present on NMS.
Add Node parameters
Parameter |
Description |
Default Value |
Acceptable Values |
|
|---|---|---|---|---|
Node IP |
Enter the IP address of the node to be added. It must be unique. |
-- |
-- |
|
Ems Name |
Select the name of the EMS to which the node has to be added. |
-- |
List of EMS names |
|
Partition Label |
Select the partition label to which the node has to be added. |
-- |
List of partition labels |
|
Is VNE |
Select the check box if the node to be added is VNE. |
-- |
-- |
|
Product Code |
Select the product code of the node to be added.
|
Tejas |
NOTE: TJ2911 is not supported for this release. |
|
Communication protocol |
Allows you to select the protocol for node communication. |
HTTP-SNMPv1 |
|
|
User Name |
Enter the name of the user. For default value, select Use Default checkbox. |
tejas |
-- |
|
Password |
Enter the password for the user login. For default value, select Use Default checkbox. |
-- |
-- |
|
Operator |
Enter the details of the operator. |
-- |
Alphanumeric characters |
|
Remarks |
Enter the remarks, if any. |
-- |
Alphanumeric characters |
|
Is GNE |
Select the check box if the node to be added is GNE. |
-- |
-- |
|
Configure NTP |
Select the check box if you wish to configure NTP and provide NTP Server IP, Network Synchronization time in seconds. |
-- |
-- |
|
Close on Success |
Select the check box to close Add Node window after the node is added successfully. This check box will be selected by default. Un-check the check box if multiple nodes are desired to be added. |
-- |
-- |
|
NOTE: The following parameters are displayed when Is VNE check box is selected. |
||||
VNE Name |
Enter the name for VNE. |
-- |
Alphanumeric characters |
|
Number of Slots |
Enter the required number of slots. |
-- |
Number of slot assigned to VNE. |
|
Location |
Enter the name of the location. |
-- |
Location of the VNE |
|
NOTE: The following parameters are displayed when Product code is selected as 'TJ2911', and communication protocol is displayed as SNMPv3. |
||||
Encryption Algorithm |
Allows you to select the authentication protocol from the drop down menu. The valid authentication protocols are md5 or sha. |
-- |
|
|
Encryption Algorithm Password |
Enter the password for login. For default value, select Use Default checkbox. |
-- |
-- |
|
Hashing Algorithm |
Allows you to select the encryption protocol used from the drop down menu. The valid encryption protocols are des or aes. |
-- |
|
|
Hashing Algorithm Password |
Enter the password for login. For default value, select Use Default checkbox. |
-- |
-- |
|
NOTE: The following parameter is displayed when Product code is selected as 'OFA' or 'ORA', and communication protocol is displayed as SNMPv1. |
||||
SNMP Community |
Allows you to enter the community name to which this entry grants access. A community name is a name associated with the switch and with a set of SNMP managers that manage it with a specified privileged level. |
-- |
The length of name can be up to 16 case-sensitive characters. |
|
NOTE: The following parameters are displayed when Configure NTP check box is selected. |
||||
NTP Server IP |
Enter IP address of the NTP server. |
-- |
Server IP of NTP. |
|
Sync Interval Time (in Seconds) |
Select the required interval time from the drop down list. |
16384 |
16, 32, 64, 128, 256, 512, 1024, 2048, 4096 8192, and 16384. |
|
NOTE: Click |
||||