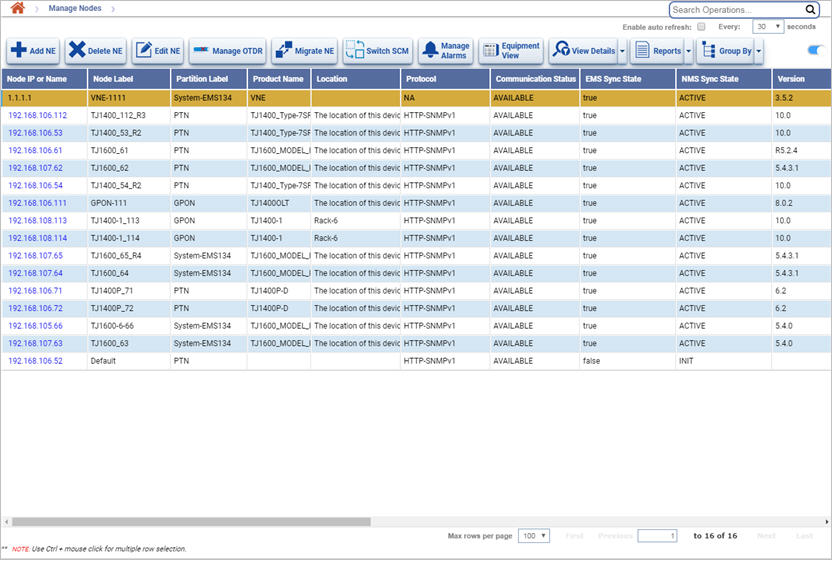
On NMS Home page, go to Topology menu and click Manage Nodes option. Manage Nodes page is displayed with a list of all Managed Elements present in TJ5500 and its details.

Manage Nodes buttons
Button |
Description |
Refer the link for more information |
|---|---|---|
|
Click Add NE button to add a Managed Element to TJ5500. |
|
|
Click Delete NE button to delete/remove the selected Managed Elements from TJ5500. |
|
|
Click Edit NE button to change the location, IP and Name of the node. |
|
|
Click Migrate NE button to migrate the selected node to another EMS. |
|
|
Click Manage Alarms button to view the alarms on the selected node. |
|
|
Click View Details button to view the circuits and View TLs on the selected node in Manage Circuits page. |
|
|
Click Reports button to export the data in any of the four formats supported namely PDF, CSV, XML, and HTML. |
|
|
Click Group By button to group the data on the page based on the parameters provided. |
|
For multiple row selection in Manage Nodes page, select a block area in the grid first and then use CTRL+ mouse click. |
||
Right-click Options
The following table lists the options available when you right-click a Managed Element in Manage Nodes page:
Right-click Options- Manage Nodes
Option |
Description |
Refer the link for more information |
|---|---|---|
ReAdd Node |
Allows you to re-add a node to TJ5500. |
|
ReSync Node |
Allows you to resolve the mismatch of node data between TJ5100 and TJ5500. |
|
Force ReSync Node |
Allows you to resolve configuration mismatch between a node and TJ5500. |
|
Force ReSync Alarms |
Allows you to resolve a mismatch of alarms between TJ5500 and a node. |
|
Toggle Configuration from Node Page |
Allows you to enable or disable configuration changes from node UI. |
|
Topology View |
Allows you to perform few operations on node from Topology view tab like node reboot, add/remove global constraint on node, and migrate port. |
|
Configure/De-configure VNE |
Allows you to configure and de-configure virtual nodes. |
|
Configure CEM Card Ports |
Allows you to configure ports on CEM1 card. |
|
NOTE: A success or failure notification will automatically pop up in Notifications window on NMS UI when ME operations are executed from NMS. These ME operations include IP address change; addition, deletion, migration, force resync, and resync of a node. |
||
The following table lists the parameters displayed on Manage Nodes page along with their description:
Manage Nodes parameters
Parameter |
Description |
|---|---|
Node IP or Name |
Displays the name or IP address of the managed element. A click the link will launch the node login page (if Radius is disabled on node) or NE Information page (if Radius is enabled on node). |
Node Label |
Displays the node label. |
NOTE: When the user click the desired row of the node, Node IP or Name and Node Label parameters are displayed at the bottom of the page and allows you to edit the Node Label and click Update button. |
|
Partition Label |
Displays the NMS partition label under which the node is present. |
Product Name |
Displays the name of the product type. |
Location |
Displays the location of the corresponding node. |
Protocol |
Displays the protocol used for EMS to node communication. Options are:
|
Communication Status |
Displays whether the node is available or unavailable for communication from NMS.
|
EMS Sync State |
Displays if the EMS is in synchronization with the NMS.
|
NMS Sync State |
Displays the NMS synchronization status after a node is added to NMS.
|
Version |
Displays the software version on the corresponding node. |
EMS Name |
Displays the name of the EMS to which the node belongs. |
Creation Time |
Displays the date and time when the node was added to NMS. |
Constraint |
Displays the constraint of the node as:
|
NMS Enrolled |
Options displayed are:
|
Ethernet IP |
Displays the ethernet IP address of the node. |
Modify Time |
Displays the date and time of the 'ReSync Node' or 'ForceReSync Node' operation last performed on the node. |
Upgraded Version |
Displays the latest version upgraded on the node. |
Navigation Keys |
|
Max rows per page |
Click drop-down button and select the maximum number of rows allowed to display per page. Acceptable values are 100, 200, 300, 400, 500. |
First |
Displays the list of nodes on first page of Manage Nodes page. |
Previous |
Displays the page following immediately before the current page. |
Next |
Displays the page following immediately after the current page. |
Last |
Displays the list of last number of nodes in Manage Nodes page where number is the 'Max rows per page'. |
NOTE: Manage Nodes displays the number of nodes present in NMS. |
|
Filtering Managed Elements on Manage Nodes Page
Managed Elements in Manage Nodes pages can be filtered based on the criteria available on the page. Perform the following steps to filter the Managed Elements (ME):
> To filter ME based on IP address, select the Node check box and then enter the node IP in IP field; Or
> To filter ME based on node label, enter the label in IP field. On entering a text, a list of options related to that text is displayed. User can select from the available options.