The steps to create the particular GPON service is explained as follows. For more details refer section Create GPON service and Create GPON Profile.
HSI Service
Perform the following steps to create High speed internet (HSI) service.
Step 1: General Attributes
Enter or select the values as provided in the table HSI service creation parameters. Click Next.
HSI service creation parameters
Parameter |
Acceptable Values |
|---|---|
Service Name |
Alphanumeric with special characters |
Customer Name |
Alphanumeric with special characters |
Technologies |
.1q/.1ad |
Service Type |
|
Forwarding Type |
|
Path Selection |
|
Domain |
|
GPON Service |
Select the check box. |
GPON Service Type |
HSI |
Step 2: Add End points
> If Domain is selected as 'Non QoS Domain' or All Domain' in General Attributes page, select the VLAN Traffic type as 'Tagged' and enter the Outer VLAN value as configured in the GPON-HSI profile only for regular mode or select the option as TLS (Transparent mode) under Traffic Type column. For All Domain the UNI port can be associated with TCProfile and CoS-0.
> If Domain is selected as 'QoS Domain', select the VLAN Traffic type as 'Tagged' and enter the Outer VLAN value as configured in the GPON-HSI profile and associate a pair of TCProfile and COS values.
Step 3: Summary
IPTV Service
Perform the following steps to create IPTV Bidirectional service.
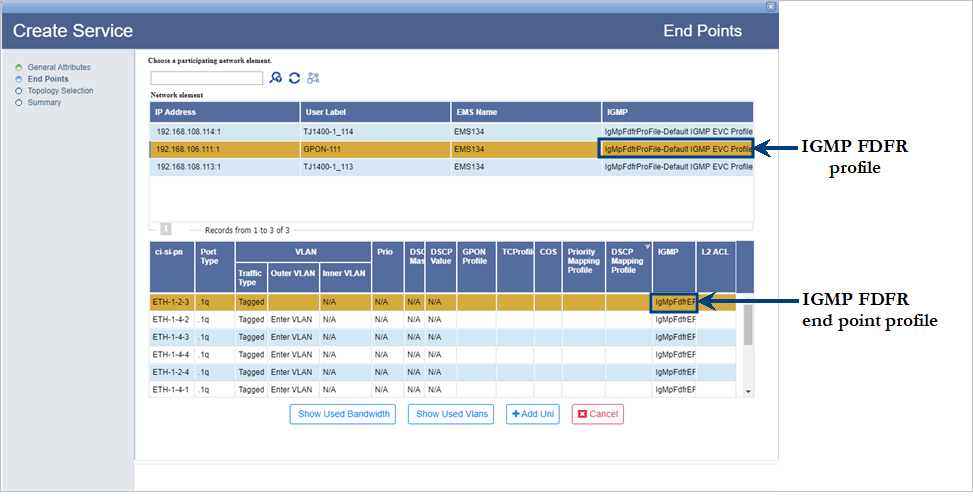
NOTE: For IPTV, before creating ELINE/ELAN service, first create IGMP Snooping profile with FDFR profile and FDFR end point profile by referring to topic IGMP Snooping.
Step 1: General Attributes
Enter or select the values as provided in the table IPTV Bidirectional service creation parameters. Click Next.
IPTV Bidirectional service creation parameters
Parameter |
Acceptable Values |
|---|---|
Service Name |
Alphanumeric with special characters |
Customer Name |
Alphanumeric with special characters |
Technologies |
.1q/.1ad |
Service Type |
|
Forwarding Type |
|
Path Selection |
|
Domain |
|
GPON Service |
Select the check box. |
GPON Service Type |
IPTV Bidirectional |
Step 2: Add End points
> If Domain is selected as 'Non QoS Domain' or All Domain' in General Attributes page, select the VLAN Traffic type as 'Tagged' and enter the Outer VLAN value as configured in the GPON-IPTV profile only for regular mode or select the option as TLS (Transparent mode) under Traffic Type column. For All Domain the UNI port can be associated with TCProfile and CoS-0.
> If Domain is selected as 'QoS Domain', select the VLAN Traffic type as 'Tagged' and enter the Outer VLAN value as configured in the GPON-IPTV profile. Attach the EVC IGMP snooping to the service and the FP IGMP snooping profile both the dynamic and static one to the ONT port and the Ethernet port respectively.

Step 3: Summary
VoIP Service
Perform the following steps to create VoIP service.
Step 1: General Attributes
Enter or select the values as provided in the table VoIP service creation parameters. Click Next.
VoIP service creation parameters
Parameter |
Acceptable Values |
|---|---|
Service Name |
Alphanumeric with special characters |
Customer Name |
Alphanumeric with special characters |
Technologies |
.1q/.1ad |
Service Type |
|
Forwarding Type |
|
Path Selection |
|
Domain |
|
GPON Service |
Select the check box. |
GPON Service Type |
VoIP |
Step 2: Add End points
> If Domain is selected as 'Non QoS Domain' or All Domain' in General Attributes page, select the VLAN Traffic type as 'Tagged' and enter the Outer VLAN value as configured in the GPON-VoIP profile only for regular mode or select the option as TLS (Transparent mode) under Traffic Type column. For All Domain the UNI port can be associated with TCProfile and CoS-0.
> If Domain is selected as 'QoS Domain', select the VLAN Traffic type as 'Tagged' and enter the Outer VLAN value as configured in the GPON-VoIP profile and associate a pair of TCProfile and COS values.
Step 3: Summary
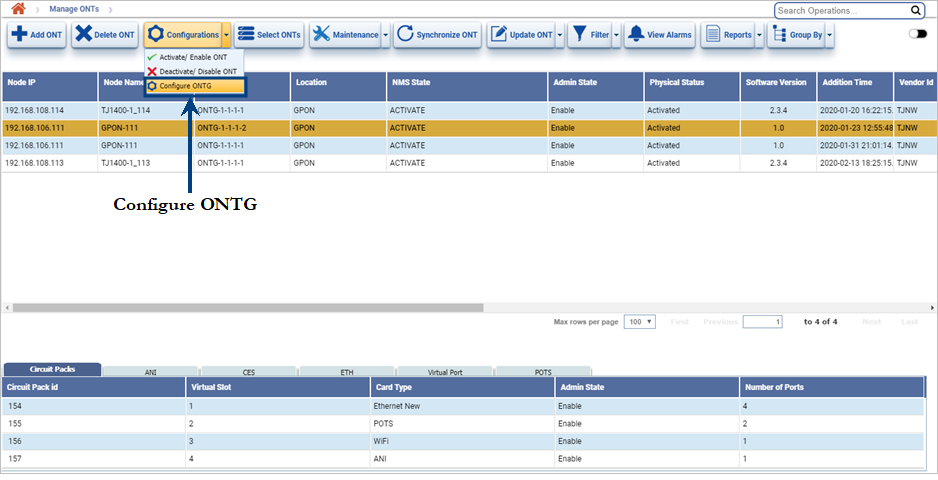
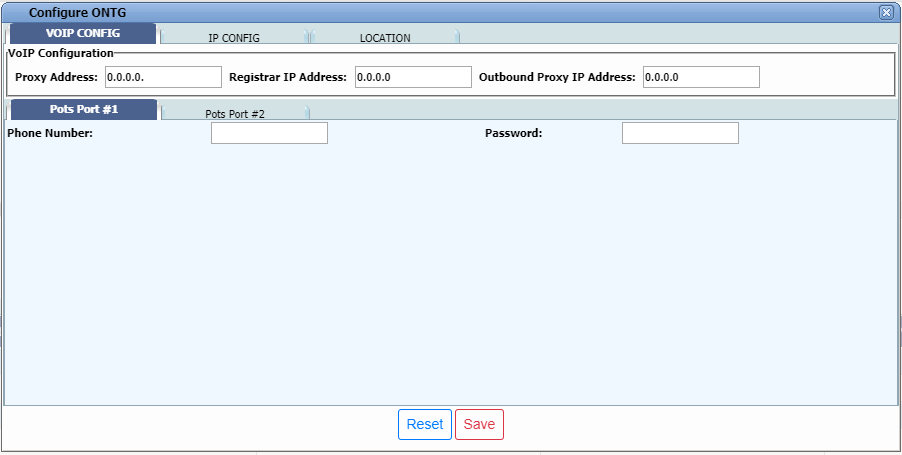
Step 4: ONT configuration for VOIP


WiFi Service
Perform the following steps to create WiFi service.
Step 1: General Attributes
Enter or select the values as provided in the table WiFi service creation parameters. Click Next.
WiFi service creation parameters
Parameter |
Acceptable Values |
|---|---|
Service Name |
Alphanumeric with special characters |
Customer Name |
Alphanumeric with special characters |
Technologies |
.1q/.1ad |
Service Type |
|
Forwarding Type |
|
Path Selection |
|
Domain |
|
GPON Service |
Select the check box. |
GPON Service Type |
WiFi |
Step 2: Add End points
> If Domain is selected as 'Non QoS Domain' or All Domain' in General Attributes page, select the VLAN Traffic type as 'Tagged' and enter the Outer VLAN value as configured in the GPON-WiFi profile only for regular mode or select the option as TLS (Transparent mode) under Traffic Type column. For All Domain the UNI port can be associated with TCProfile and CoS-0.
> If Domain is selected as 'QoS Domain', select the VLAN Traffic type as 'Tagged' and enter the Outer VLAN value as configured in the GPON-WiFi profile and associate a pair of TCProfile and COS values.
Step 3: Summary
Step 4: ONT configuration for WiFi
After creating the service configure the ONT by directly logging in into the ONT UI. For detailed configuration, refer respective ONT manual.
VBES Service
Perform the following steps to create VBES service.
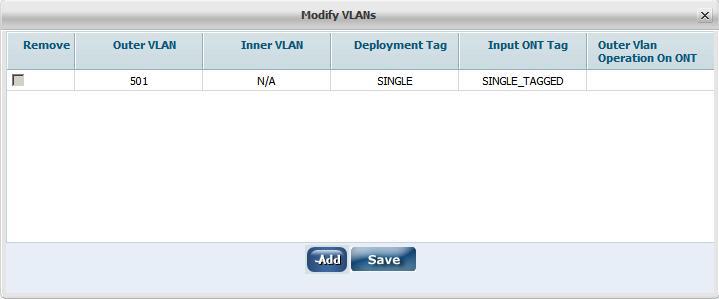
VBES supports a total of 12 VLANs, where the first VLAN is added at the time of selecting the UNI ports and the next 11 VLANs are added after service creation.
Step 1: General Attributes
Enter or select the values as provided in the table VBES service creation parameters. Click Next.
VBES service creation parameters
Parameter |
Acceptable Values |
|---|---|
Service Name |
Alphanumeric with special characters |
Customer Name |
Alphanumeric with special characters |
Technologies |
.1q/.1ad |
Service Type |
|
Forwarding Type |
|
Path Selection |
|
Domain |
|
GPON Service |
Select the check box. |
GPON Service Type |
VBES |
Step 2: Add End points
> If Domain is selected as 'Non QoS Domain' or All Domain' in General Attributes page, select the VLAN Traffic type as 'Tagged' and enter the Outer VLAN value as configured in the GPON-VBES profile only for regular mode or select the option as TLS (Transparent mode) under Traffic Type column. For All Domain the UNI port can be associated with TCProfile and CoS-0.
> If Domain is selected as 'QoS Domain', select the VLAN Traffic type as 'Tagged' and enter the VLAN value as configured in the GPON-VBES profile and associate a pair of TCProfile and COS values.
NOTE: VBES supports a total of 12 VLANs out of which only one can have Input ONT Tag as Untagged.
Step 3: Summary
Step 4: Addition of VLANs
NOTE: After adding/deleting VLAN the 'Admin state' of the service will be shown as 'Partial', hence the service must be activated after modifying VLANs. For more details refer topic Actions on Service Information window.

NOTE: After adding/deleting VLAN the 'Admin state' of the service will be shown as 'Partial', hence the service must be activated after modifying VLANs.