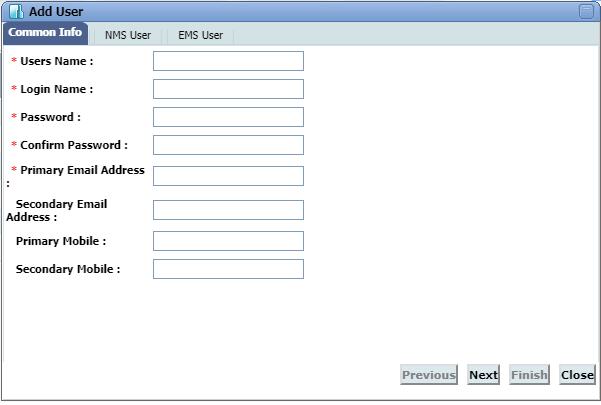
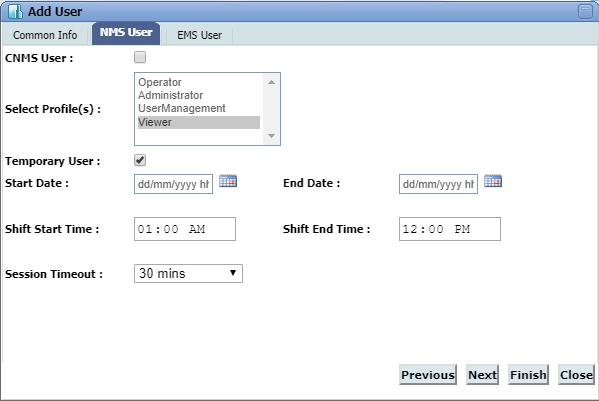
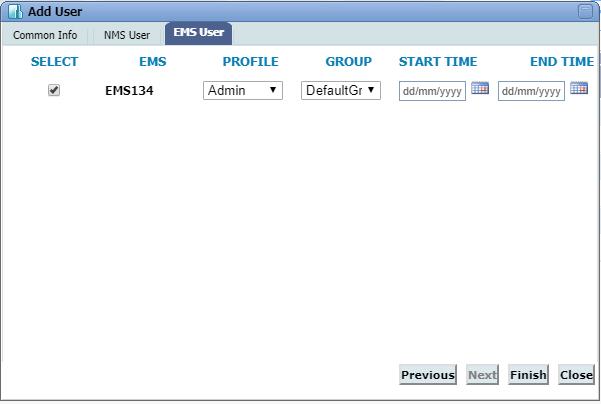
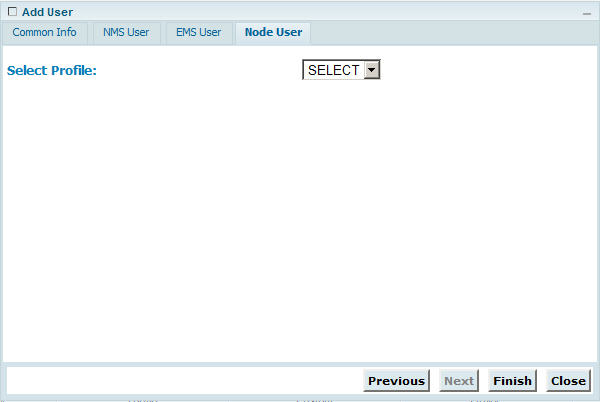
Add User option allows you to create users for TJ5500, TJ5100, and Tejas Nodes by specifying same or even different profiles using 'UserManager' account. For example, 'user1' is created as Viewer for TJ5500 system, then the same can be created as Operator for TJ5100 and Admin for Nodes.
NOTE: In Topology View > Network View (Nodes), Node right-click options like Launch Equipment View will display result only if EMS and NMS have a common User Name.
Perform the following steps to create a user for TJ5500, TJ5100 and Node from TJ5500 UI:

A red asterisk (*) marked against the parameter indicates that these fields are mandatory and cannot be left blank.


If START TIME and END TIME is selected, then the EMS User becomes a temporary user.
NOTE: Node User tab is visible only when RADIUS is enabled on NMS.

NOTE: User can be created for NMS or NMS and EMS or NMS and Node or NMS, EMS, and Node. But a user cannot be created only for EMS or Node.
Add User parameters
Tab |
Parameter |
Description |
|
|---|---|---|---|
Common Info |
User Name |
Enter the name for the user. |
|
Login Name |
Enter the login name for the user. Special characters are not supported except - (hyphen) and _ (underscore). |
||
Password |
Enter the password for the user login. |
||
Confirm Password |
Re-enter the password provided in 'Password' for confirmation. |
||
Primary Email Address |
Enter the email address to which the user's password will be sent in case of password resetting or if the user gets blocked. |
||
Secondary Email Address |
Enter another email address to which the user's password will be sent in case if the primary email address is inaccessible. |
||
Primary Mobile |
Enter the mobile number for reference. |
||
Secondary Mobile |
Enter another mobile number for backup. |
||
NMS User |
CNMS User |
Select the check box if the user being created is a CNMS User. |
|
Select Customer(s) |
Select the desired customer from the list. This parameter is displayed when 'CNMS User' check box is selected. |
||
Select Profile(s) |
Select the profile desired to associate with the user from the list. This parameter is applicable when 'CNMS User' check box is not selected. |
||
Temporary User |
Allows you to select the check box that indicates the corresponding NMS user is temporary and has a login for a specified duration. |
||
Start Date |
Click on the calender icon and set the access duration for the NMS user defining the starting day. |
||
End Date |
Click on the calender icon and set the access duration for the NMS user defining the ending day. |
||
Shift Start Time |
Set the access duration for the NMS user defining the starting time in the specified day. |
||
Shift End Time |
Set the access duration for the NMS user defining the ending time in the specified day. |
||
Session Timeout |
Select NMS session timeout for the user from the list. Acceptable values include 30 mins, 45 mins, 1 hour, 1 hour 30mins, and 2 hours. If case of no user activity, the user will be automatically logged out of NMS WUI after the session time expires. |
||
NOTE: The Session Timeout for default users is 30 minutes and cannot be changed. |
|||
EMS User |
SELECT |
Select the check box against the EMS(s) desired to add for the user being created. |
|
EMS |
Lists the EMS(s) present on the NMS. |
||
PROFILE |
Select the profile type from the options listed. |
||
GROUP |
Select the group for the user being created from the list. |
||
START TIME |
Set the access duration for the EMS user defining the starting day and time. |
||
END TIME |
Set the access duration for the EMS user defining the ending day and time. |
||
NOTE 1: Start date should be less than End date. Current date or any date greater than current date can be set as Start date. NOTE 2: Start time should be less than End time because they are applicable on per day basis for the Start to End date duration. |
|||
Node User |
Select Profile |
Select the profile for the node user from the options namely USER, OPERATOR, OPERATOR2, ADMIN. |
|
NOTE: When the user profile is created for the first time and whenever the new user logins with the user credentials (user name and password), the user is prompted to change the password on login. For changing the password, refer Launch the TJ5500 desktop client.