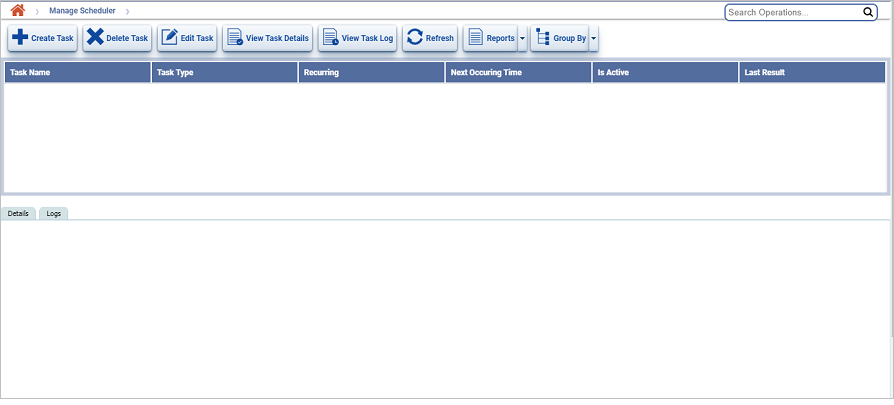
Manage Scheduler option allows you to create, edit, delete and manage the schedules for the following tasks:
Click Administration > Manage Scheduler to open the menu.

Buttons |
Description |
|
Use this button to create a new task such as a report generation task. |
|
Use this button to delete a selected task. |
|
Use this button to edit a selected task. |
|
Use this button to see the details of a selected task. |
|
Use this button to view the logs of a selected task. |
|
Use this button to refresh the task displayed on the Manage Scheduler page. |
|
Use this drop-down list to choose the appropriate format of the Summary Report. The format options are PDF, CSV, XML and HTML. |
|
Use this drop-down list to choose a group criteria and group the tasks. The group criteria options are taskType, recurring, lastResult, UnGroup, Expand/Collapse Group. |
Click Administration > Manage Scheduler to open the menu.
On the Manage Scheduler page, click the appropriate button as listed in the table.

Tabs |
Description |
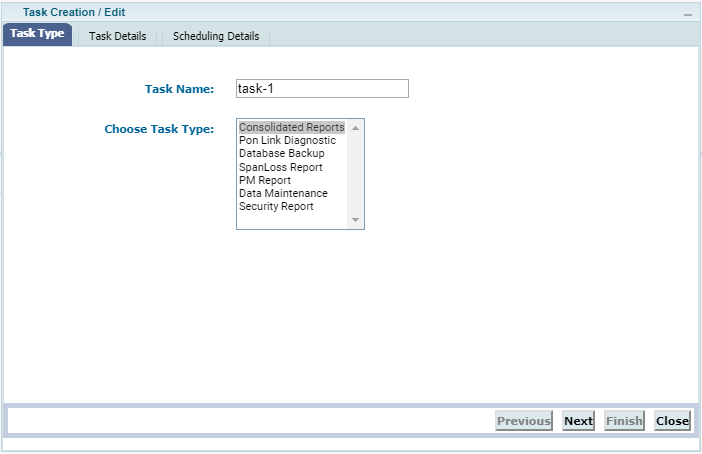
Task Type |
Task Name: Provide a name for the task. It is recommended that the name reflects the nature of the task. Choose Task Type: Select the appropriate task type from the list. |
Task Details |
On the Task Details tab, provide the relevant details for the task. The parameters on the Task Details tab depend on the task type chosen. Each task type has a specific parameters. |
Scheduling Details |
On the Scheduling Details tab, provide the Schedule Time (date and time that you can also pick on a calendar by clicking the In the Recurring section, click the Yes radio button option to set the recurrence of the task schedule. Click No radio button option if you do not want the task to recur. In the Activate/Deactivate Task section, click the Activate Task button to activate the task. Click the Deactivate Task button to deactivate the task schedule. |
Click Next or Previous to move between the tabs. Provide all the necessary details on each tab before you click Next. The next tab is only available if all the details on each tab are provided.
After providing the details in all the tabs, click Finish.
For detailed steps to create tasks based on each each task type, see Create Scheduler Tasks.
The Task Creation/ Edit window is common to both the Create Task and Edit Task functions. See the Create Task section and Create Scheduler Tasks for details of tabs and parameters that you can edit or modify for a task.
Note: You cannot edit or change the Task Type.
To refresh the page and load the latest schedules.
Click Refresh ![]() .
.
To generate Summary Reports in PDF, CSV, XML and HTML.

To group the scheduled tasks by specific criteria.
To expand or collapse a grouped list, select Expand/Collapse Group option from the Group By drop down menu.
To Ungroup a grouped list, select Ungroup option from the Group By drop down menu.