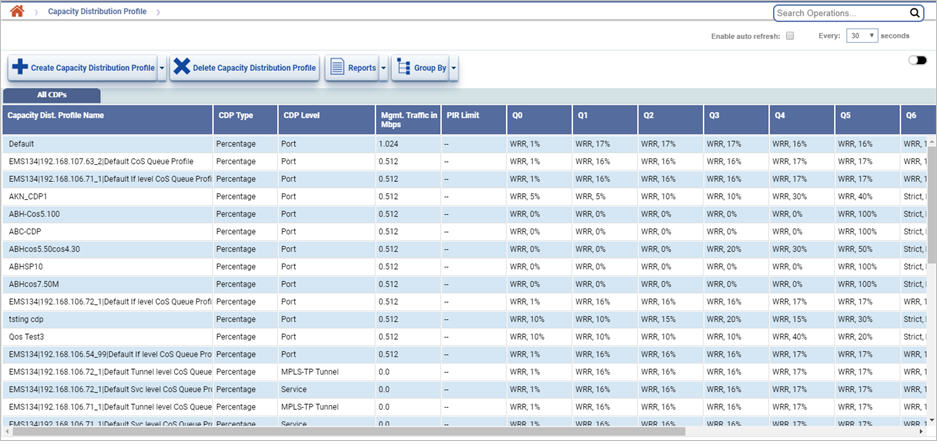
Capacity Distribution Profile (CDP) is used to control the amount of traffic on each COS on ports.
To view the CDP profiles, go to Configuration > Layer 2 > Qos menu and click Capacity Distribution Profile option. The Capacity Distribution Profiles page is displayed.

Capacity Distribution Profile buttons
Button |
Description |
Refer the topics for more information |
|---|---|---|
|
Click Create Capacity Distribution Profile button to add a new Capacity Distribution Profile. |
|
|
Click Delete Capacity Distribution Profile button to delete the selected Capacity Distribution Profile(s). |
|
|
Click Reports button to export the data in any of the four available formats namely PDF, CSV, XML, and HTML. |
|
|
Click Group By button to group the Capacity Distribution Profiles. |
Capacity Distribution Profile parameters
Parameter |
Description |
|
|---|---|---|
CDP Type |
Displays the type of Capacity Distribution Profile being created. |
|
Capacity Dist. Profile Name |
Displays the name of the Capacity Distribution Profile being created. |
|
CDP Level |
Displays the level of CDP. |
|
Management Traffic in Mbps |
Displays the value assigned for management traffic in Mbps. |
|
PIR Limiting |
Displays the limit set for Peak Information Rate (PIR). |
|
Queue 7 and Queue 6 |
Displays the associated Egress Shaper Profile (created through Traffic Conditioning Profile) under Bandwidth Distribution for the Strict scheduler type. |
|
|
||
Queue 5 to Queue 1 |
Displays the Scheduler type for the queue and the desired bandwidth distribution accordingly. |
|
|
||
Queue 0 |
Displays the default Scheduler type and the assigned bandwidth. |
|
|
Filtering Options
Perform the following steps to view the filtering options and filter the search based on the parameters displayed:
Node/IP: To filter CDP by node name, enter the node name in text box. To search CDP based on node IP, select the check box and then enter the IP Address in the text box. On entering characters, the list related to that characters is displayed and the user can select from the options.