Previous Topic

Next Topic

Book Contents

Book Index

Viewing and Editing Laser Details

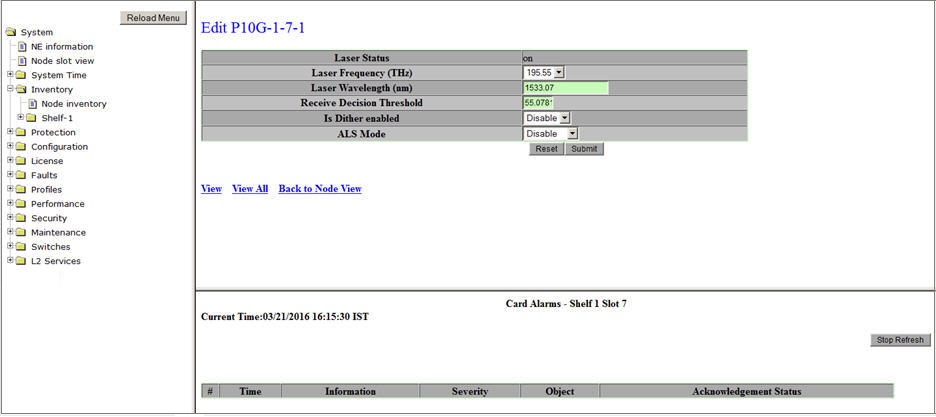
Perform the steps given below to edit the laser details. This procedure is explained with HCPSLine22 card as a reference.

  1. Click Inventory > Node inventory in the navigation pane. The Node Inventory preview pane is displayed. Click on the Slot 'number' corresponding to the HCPSLine22 card.

    OR

    Click System > Node slot view in the navigation pane. The Node slot view preview pane is displayed. Click on HCPSLine22 card.

  2. On HCPSLine22 Aggregate Card preview pane, click on the Ports link. The Ports on Card Shelf : 1 Slot: <slot number> preview pane is displayed.
  3. Under the Port name field, click on the desired STM port link. The Provision interface - STMn-1-<slot number>-<port number> preview pane is displayed.
  4. Click the link displayed against the Laser parameter. The laser details are displayed.
  5. Click on the Edit link. The Edit preview pane is displayed.

    NOTE: Editing Laser details is dependent on the SFP/XFP used. If a user has a normal 10km 1310nm SFP, only Laser Status and ALS Mode parameters are displayed. If the user has DWDM Tunable XFP then, additional parameters namely Laser Frequency (THz), Laser Wavelength (nm), Receive Decision Threshold, and Is Dither enabled are also displayed.

    Edit Laser Details- Tunable XFP

  6. Select or enter value for the desired parameters. For parameter description, the default and acceptable values supported, refer to Edit Laser parameters table given below.
  7. Click Submit. A confirmation message is displayed.
  8. Click Accept Valid Modifications. A "Successfully Modified" message is displayed.

    A click on Back link will direct you to the Edit preview pane.

Editable Laser parameters

Parameter

Description

Default Value

Acceptable Values

Laser Status

Displays the status of the laser.

on

--

Laser Frequency (THz)

Allows you to select the operating frequency of the laser in the transceiver.

--

192.00 to 195.95 with 50Ghz spacing

Laser Wavelength (nm)

Displays the laser wavelength as per Laser Frequency value selected. The default value of this parameter is set as per the 'Laser Frequency' selected.

--

1561 to 1529nm

Receive Decision Threshold

Allows you to enter the decision threshold value which is required to identify the bit format of the received signal.

50

1 to 100

Is Dither Supported

Select the option suitable for Dither support.

  • Enable: Suppresses SBS (Stimulated Brillouin Scattering). Hence, reduces signal deterioration and provides higher individual channel launch power of up to 15dBm.
  • Disable: When dither is disabled, maximum per channel launch power is limited to <=13dBm. Beyond this, signal gets distorted due to SRS.

Disable

  • Disable
  • Enable

ALS Mode

Select the value based on the requirement.

  • Disable: ALS is disabled. LOS will not cause laser shutdown.
  • Automatic: Laser automatically turns on when ALS agent detects an LOS. If LOS still exists at that time, the laser is shut down again. This pattern continues until the LOS is cleared for 100 ms; then, the laser will stay on.
  • Manual: A manual command can be issued that turns on the laser. Laser remains on only if there is no LOS on the transmitter.

Disable

  • Disable
  • Automatic
  • Manual

NOTE: The user can also edit laser details of the desired SFP/XFP by selecting the required card from the Shelf-1 sub-menu under Inventory in the navigation pane.

Manual Laser Test

Manual Laser Test link is available only when the ALS is configured in 'Manual' mode. When ALS is configured in manual mode and LOS is detected on port, then in the next refresh, ALS manual command link will appear in the WUI.

You can reach to this link by clicking on Laser hyperlink on the Provision Interface - STM page. Clicking on this link will take you to a new page where you can issue a Manual Restart or a Manual Restart Test command.

See Also

Working With Inventory Menu

Viewing Node Inventory

Deleting Card Configurations

Deleting Pluggable Modules

Shelf Sub-menu

Rack Shelf Sub-menu

Pre-Configuration

Viewing Laser Details

Viewing CFP Laser Details

Editing CFP Laser Details

Configuring HCPSLine01 Card

Configuring HCPULine01 Card

Configuring HCPSLine03 Card

Configuring HCPSLine08 Card

Configuring HCPSLine22 Card

Configuring CEF-5 Modes

Performing Forced Switch Over

Force Recovery on CEL-3 Card

Working with Optical Adapter Card

Working with Optical Fiber Amplifier Card

Working with FPU01 card