![]()
![]()
![]()
![]()
|
|
|
|
|
Click Inventory > Node inventory in the navigation pane. The Node Inventory preview pane is displayed.
The Node Inventory pane displays the following:
Figure below shows the Node Inventory pane with Shelf details.
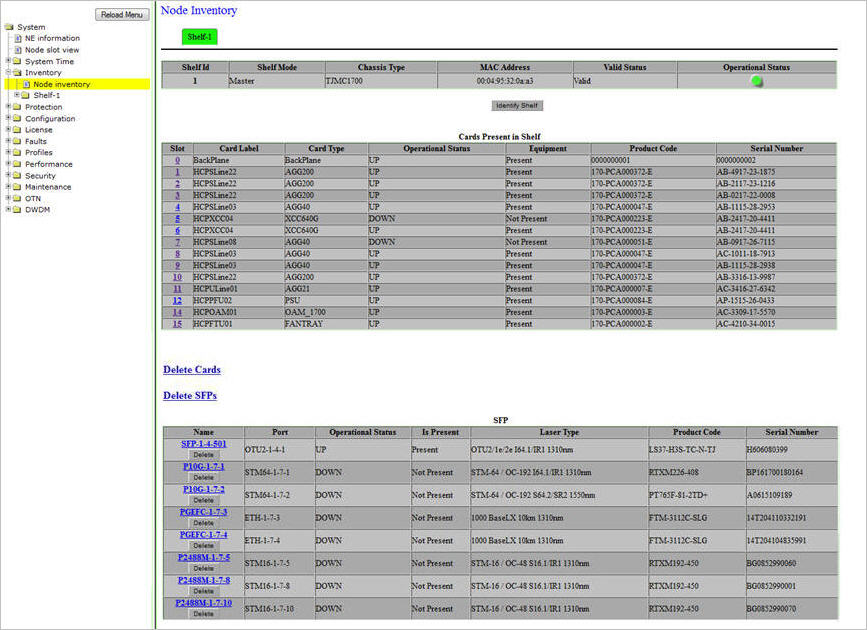
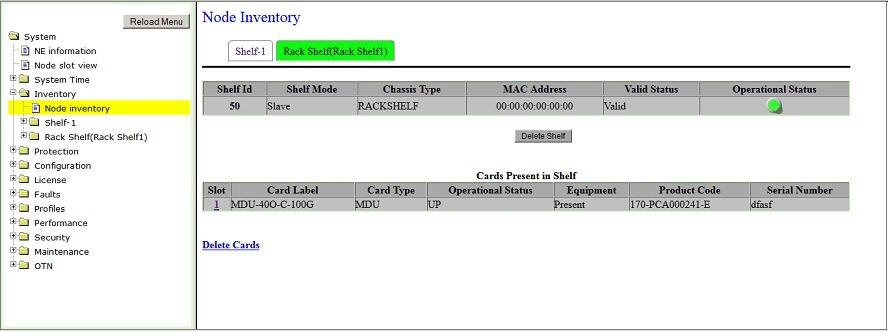
Figure below shows the Node Inventory pane with Rack Shelf details. The details are displayed only when a card/unit is added to the Rack Shelf.
NOTE: The Node Inventory does not refresh automatically. You need to manually refresh the page or the pane to view any changes made to the node inventory by clicking the Node inventory option in the navigation pane.
Node Inventory parameters
Parameter |
Description |
|---|---|
Shelf-1/Rack Shelf (Shelf Identifier) |
|
Shelf Id |
Displays the identity of the Shelf or the Rack Shelf. |
Shelf Mode |
Displays the shelf mode as Master or Slave. Rack Shelf will always display as 'Slave'. |
Chassis Type |
Displays the chassis type of the Shelf or the Rack Shelf. |
MAC Address |
Displays the MAC address of the Shelf or the Rack Shelf. |
Valid Status |
Displays the status of the shelf as 'Valid' which indicates that the current shelf is in Master mode. |
Operational Status |
Displays the operating status of the Shelf or the Rack Shelf.
|
Identify Shelf |
This button is applicable in Multi Shelf Support 'Enable' mode which is not supported in this product release. |
Delete Shelf |
Click on the button delete the Shelf or Rack Shelf configurations. A confirmation message will get displayed. Click Yes. "Successfully Deleted Shelf" message will get displayed. |
NOTE 1: In Multi Shelf Support 'Disable' mode, only Shelf-1 tab will be displayed with Shelf Id parameter value as '1' and Shelf Mode as 'Master' by default. NOTE 2: The Rack Shelf(Shelf Identifier) tab is displayed if a Rack Shelf with passive card/unit is connected and added to the Master Shelf, for example MDU40E-D and/or MDU40O-D unit housed in a standalone 1 RU 19’’ sub-rack. Click on this tab to view the rack shelf details and the cards present in the rack shelf. |
|
Cards Present in Shelf |
|
Slot |
Displays the slot number in which the card is present. Slot number '0' is assigned to Backplane by default. Also provides a slot number hyperlink to view the card parameters such as shelf, product code, serial number of the desired card. |
Card Label |
Displays the name of the card. |
Card Type |
Displays the card type. |
Operational Status |
Displays the operating status of the card as UP or DOWN. |
Equipment |
Displays whether card is currently jacked in or not. |
Product Code |
Displays the product code of the card. |
Serial Number |
Displays the identification number of a specific card. |
Delete Cards |
Allows you to click on the link and delete the cards removed from the node. |
Delete SFP/CFPs |
Allows you to click on the link and delete the SFP/CFPs removed from the node. |
The table below summarizes the parameters displayed under SFP and CFP section on Node Inventory pane.
SFP/CFP parameters
Parameter |
Description |
|
|---|---|---|
Name |
Displays the name of the SFP/CFP and provides a hyperlink to view and edit its details. This field also has a Delete button which allows you to delete individual SFP/CFP. It is not required to physically remove the SFP/CFP before deleting; the SFP/CFP will auto-provision with the slotted SFP/CFP values. |
|
Port |
Displays the port to which the SFP/CFP is associated. |
|
Operational Status |
Displays the operating state of the SFP/CFP as UP or DOWN. |
|
Is Present
|
Present |
Indicates the SFP/CFP is inserted. |
Not Present |
Indicates the SFP/CFP is not inserted. |
|
Laser Type |
Displays the laser type. Laser type specifies the capacity and range of the laser used in the particular interface. |
|
Product Code |
Displays the product code of the SFP/CFP. |
|
Serial Number |
Displays the identification number of the SFP/CFP. |
|
NOTE: Lasers are specific to the interfaces. Ensure that the SFP/XFP inserted is specific to the interface. Therefore, an SFP supporting STM-1, STM-4, STM-16 or an XFP supporting STM-64 laser can be inserted only into an STM-1, STM-4, STM-16 or STM-64 interface respectively. The ranges that a laser can have are Long Reach, Short Reach, and Intermediate Reach. |
||